I wish I would have been able to take a picture of this one to do it justice, but alas, since it was an experiment and I wasn't sure how it would work out, I opted not to take any pictures.
I have been wracking my brains trying to find meals that my picky and poor eating toddlers will enjoy. Faith has sensory issues that go along with her Autism and flat out refuses to even try some meals because they don't appear "safe" (ie something she has had before) even if it has elements that are on her safe food list...she will take one look, get up from her chair, and walk away from her plate. Phillie is going through her terrible two "I won't eat it since sissy isn't eating it, but maybe I'll take a bite" phase...
I posted a thread on Facebook today asking for dinner ideas. One of my friends mentioned doing a pizza pot for dinner. I was intrigued, but found that most of the recipes for pizza pot that I was finding (including the recipe my friend gave me) required cooking in a crock pot...something I didn't have time for, unfortunately, since it was already 4:30 when I made my inquiry...
But, considering that my kids love pizza, and I had all the ingredients on hand, I decided to try to make a skillet version. It was SUPER quick and I think it turned out super darn tasty (still haven't made it for my husband who is out of town in Canada for business this week, so the official jury is still out, but I thought it was pretty darn tasty.) The best part was the cheesy, gooey, globs that stuck the pasta and pepperoni together because of how I prepared it.
I think if you have older kids that can verbally communicate, if you say the words "pizza pasta" they will probably be all over this one...and the best part (no, having kids all over it isn't the best part) is that it took less than 15 minutes to make.
You will need (this makes 4-6 servings)
1/2 box or bag of your favorite pasta (I used the mini lasagna noodles, can't remember what they're called, but any old pasta besides spaghetti would work. I don't think spaghetti would do well because the ingredients wouldn't evenly distribute very well through it.)
1/2 package of pepperoni, pepperoni slices cut in half
1 jar (14 oz) pizza sauce (or you can just make 1 recipe of your favorite homemade pizza sauce...I just happened to have some Ragu pizza sauce on hand that we purchased while it was on sale. I still like my homemade pizza sauce better, but the Ragu is nice when you're in a pinch)
2 cups mozzarella cheese diced into cubes (believe me, you will WANT to dice and cube some mozzarella. I did mine in about 1 inch squares.)
Prepare your pasta according to package instructions for al dente finish. Drain. Dump in your pizza sauce, add your pepperoni and stir until the pepperoni is evenly distributed throughout the pasta. Then add your mozzarella and stir until evenly distributed. Cover your pan with a lid for a few minutes until you notice the mozzarella getting soft. Stir your lovely concoction until you notice little strings coming off of the mozzarella cubes...
Then, plate and top with parmesan. We ate ours with green beans on the side. It was AWESOME (or at least I thought it was.)
Of course, you can add other favorite pizza toppings to it too. If you're planning on green peppers and onions, this may become not so much of a 1 pan meal because you'd likely want to sautee those to soften them a bit before you add them to the pasta mix.
Seriously, you WANT the globs of mozzarella, its like a little bite of pizza heaven when you pick up a glob of mozzarella with pasta and pepperoni sticking to it. SO GOOD! (Really, so sad I didn't take a picture of it before it was all gone.)
Happy eating, until next time my darlings.
Showing posts with label Italian. Show all posts
Showing posts with label Italian. Show all posts
Monday, February 10, 2014

Friday, July 5, 2013
Who needs Olive Garden? or Manicotti with Homemade Noodles
I'm back!
For the "Noodles" (crepes)
Mix 1 c flour
2 eggs
1 tsp vegetable oil
1/2 tsp salt.
It will be runny like the picture below. Try to get as many of the lumps as you can out of it as you whisk it.


Did you miss me?
Did you even know I was gone?
This is another post entirely, but we unexpectedly moved to Rock Springs, WY a week ago. I will tell you all about it...but I figured you'd all want a recipe more than reading the life and times of a diva named Brittany right now...
So....here goes...
There it is! That hankering! That craving you just can't deny....you want Italian food....No- you don't want to pop open a can of premade spaghetti sauce and boil some noodles...you want something CLASSY...something a little more refined than a pile of noodles on a plate. Maybe its your anniversary? Maybe its a date night?...and maybe you're as poor as a church mouse and can't afford to go to Olive Garden or some other Italian place like Carinos, etc. and spend $10-30 a plate on a meal...
Don't worry friend...I've got your back! YOU TOO CAN MAKE DELICIOUS ITALIAN DISHES AT HOME AND IT IS EASY!!!
Manicotti...
Yes...those cheese filled tubes are calling your name...but those Manicotti noodles you buy at the store...they are so cumbersome, aren't they? You have to take 20 minutes to boil them and then half of them split in half as you're trying to fill them and your Manicotti ends up looking like a sad mess and not an elegant, refined, date night kind of meal...
But, what if there was another way? What if you could make your own noodles and it would be SUPER easy and take less time than boiling and filling those premade tubes of yuck....
I have the way my friends...in high school I was introduced to this method by a sweet old lady on the first, and only real date I ever went on (again, a story for another day). It was the Commencement dance. We went to some lady's house for dinner (I can't for the life of me remember her name.) and she made the most delicious Manicotti EVER and when she found out I was so interested in the recipe. She divulged to me her secret for the noodles...CREPES...
It changed my life, and its about to change yours...here it is...
Better than a Restaurant Manicotti:
Mix 1 c flour
2 eggs
1 tsp vegetable oil
1/2 tsp salt.
It will be runny like the picture below. Try to get as many of the lumps as you can out of it as you whisk it.

Lightly spray either a crepe pan (pictured below) or if you don't have one, a small 6 inch/8 inch frying pan and heat it up over medium heat. Pour a thin layer of the mixture into the pan after it heats, making sure that it will spread out to the edge of the pan. If you have a crepe pan, put the top part down and let it cook, if you are using a small frying pan, just let it sit and cook until the edges are starting to firm up and turn slightly brown.

Flip the crepe by either flipping the pan (with crepe pan) or using a spatula and let it sit for 5-10 seconds. You only want to make sure there is no raw batter left. You should be left with a round that is slightly browned on one side and shiny like a cooked noodle on the other, like so:
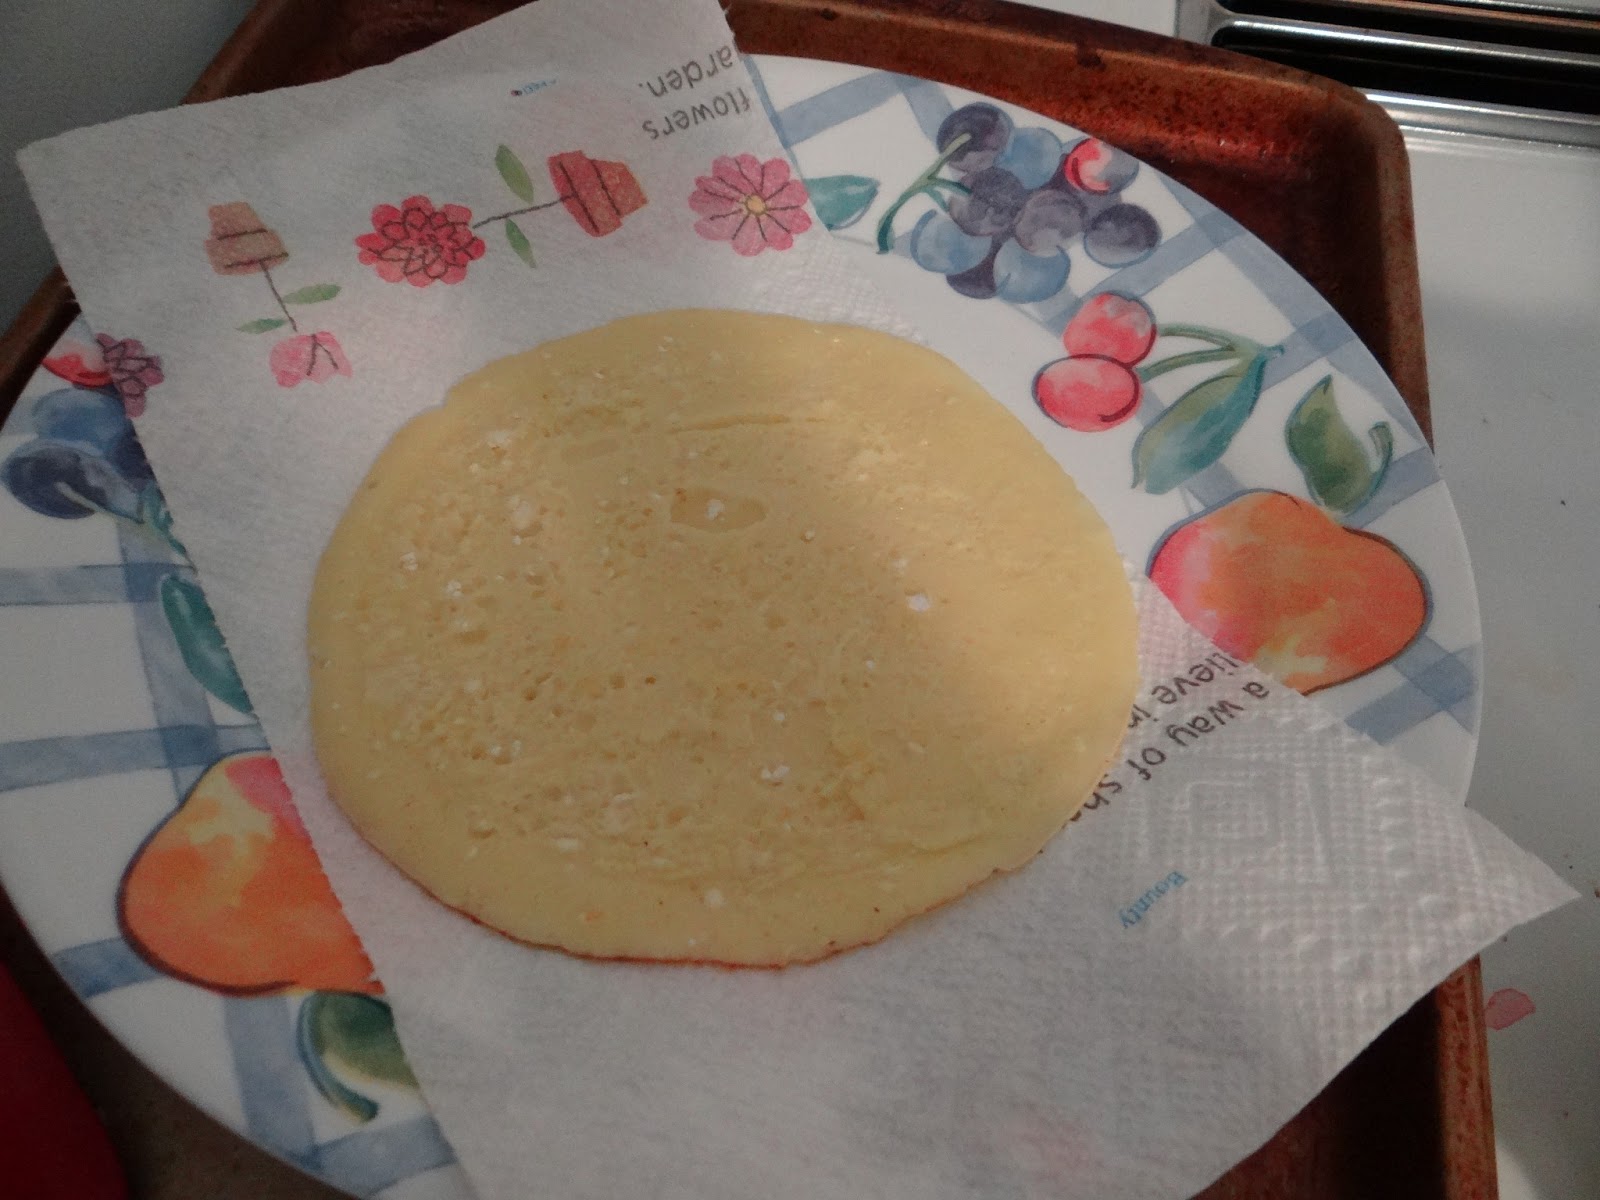
So the crepe doesn't stick to the plate, be sure to put a napkin beneath it. They shouldn't stick to one another if you have cooked off all the raw batter.This batch should make 10-12 crepes. Enough to fill a 9x13 pan across.
Spray the pan again, and repeat until all the crepes are made. This process should take as little as 10 minutes to complete.
Once you have your crepes, you can make your filling. My favorite thing to do is take this basic cheese filling that I will share the recipe for, and add some cooked chicken (boiled or pan fried and cut into small chunks), bell peppers, and about a clove of minced garlic (or 1/2 tsp of garlic powder) to make a unique and VERY tasty dish...but I told you we just moved...so you get to see the basic cheese recipe...
In a bowl mix:
One 15 oz carton of Ricotta (ignore your inner urge to be cheap and try to use cottage cheese...it will be runny and won't work...yes, cottage cheese can work if you drain ALL the whey off the cheese curds, but then it takes 3 times the cottage cheese to make the recipe work, not to mention 5 times the work and effort, and it won't be cheaper by then...besides...COTTAGE CHEESE ISN'T HOW THE ITALIANS DO IT...we are trying to be better than Olive Garden here!)
1 egg
1/2 c parmesan cheese
1/2-1 cup shredded cheese of your choice (Italians would use Mozzarella, but if all you have in the house is cheddar or colby jack...fine...)
1/4 tsp of salt
1 TBS of parsley
(at this point you can add the aforementioned chicken recipe above, but mine is just going to be the cheese mixture. Its okay that its a little dry. You don't want it to be runny and cook out the sides of the noodle shells)
Now, pull out your 9x13 pan. Open your spaghetti sauce of choice (if we hadn't moved, mine would have been my homemade spaghetti sauce that I make in the crock pot and then freeze the leftovers for Italian dishes down the line, but I didn't have time and we are still living out of boxes, so I used my favorite store brand which is Prego Heart Smart Traditional- I love the Veggie Smart, but I don't think they sell it anymore, I haven't been able to find it for a while. P.S. I will leave the recipe for my crock pot, freezer sauce at the end of this blog.)
Pour about a half of your bottle of spaghetti sauce (maybe a cup to cup and a half worth) onto the bottom of the pan and spread it out.

Then, add one heaping spoonful of your cheese mix to the middle of one of your crepe noodles on the browned side. Roll it like a taco, being sure to make sure that the pasta spread out almost to the ends of the rolls. Place on top of the sauce in the pan seam side down to prevent it from unrolling.

REPEAT

Top with remaining sauce and sprinkle with about a cup (or more depending on how cheesy you like it) of shredded cheese and sprinkle with parmesan.

Cover with aluminum foil (shiny side down, facing the food for you cooking novices out there...this helps direct the heat to the food and makes it cook evenly) and bake at 375 degrees (fahrenheit...saw a complaint on another blog from our friends in Australia since they cook using a different meter on their ovens) for 25 minutes. Remove the foil and cook for another 10-15 minutes until the cheeses are browned a bit and bubbling...
Et Voila' !
(sorry we dug in before I could get a picture of the finished product...)
I am not a super heavy eater and I eat 1-2 noodles, my husband will eat 2-3. If you get all 12 in the pan, that means it will serve 4-6 people...and for WAY cheaper than the Olive Garden... You can also fry some ground meat and add it to the sauce before you sauce your pan and your noodles...but this vegetarian version is just as tasty...you won't even miss the meat. I know my husband doesn't (and he is one of the biggest carnivores I know!)
As promised...for those of you interested. Here is my recipe for Crock Pot Spaghetti Sauce. I usually just spoon it into quart freezer bags. I find that I usually only need one bag to make a recipe that serves about 4 people. It will store for 3 months. It works out to be much cheaper than buying store bought sauce...and its MUCH more tasty! I seem to remember it making 4-6 bags of sauce.
2 (15 oz) cans of diced tomatoes (you can use stewed, but I find those chunks are too big. You can also use Italian style diced tomatoes to add some increased flavor, if you're fond of basil and oregano)
3 cans (15 oz) tomato sauce
2 TBS minced onion (dried or fresh, doesn't matter- fresh is much more pungent) or onion powder
2 TBS parsley
2 tsp Italian Seasoning herbs
3 tsp salt
3 tsp sugar
2 tsp minced garlic or garlic powder
(optional) 1/2 diced small and fine green pepper (I don't always have it on hand, and I've made it without the green pepper and it tastes just as awesome.)
Pour all ingredients in the crock pot. Stir well together. Cook on low for 4-6 hours, stirring occasionally.
Let cool and spoon into quart bags or jars and freeze. Be sure to write the date so you know when its "past its prime"
Bon Appetit until next time, darlings!
Friday, May 10, 2013
Better than a Restaurant: Stuffed Crust Pizza
Okay....
I know its super easy to call Dominos or Pizza Hut, make an order and wait for the delivery guy...
But, given our current employment situation (or lack thereof) a pizza delivery is just a luxury that we can't afford...
So, I ask you, WHY pay $20 for something that you can make for around $5-7 at home (depending on the amount of ingredients you use)? Plus...if you make it at home, you get the added peace of mind that comes from knowing exactly what ingredients are in the foods you're eating....
So, without further ado, I give you the one recipe that will make you want to forget about calling for a pizza delivery (at least my husband thinks so...and he is practically a food critic...)
So...here comes your picture tutorial!
You WANT to start your sauce first- the longer it gets to simmer, the more flavorful it will be.
Into your blender you want to place:
1 15 oz can diced tomatoes (juice and all)
1 tsp of sugar
1/4 tsp oregano
1/4 tsp basil
1/4 tsp thyme
1/2 tsp garlic powder (or 1 clove garlic minced...)
1/4 tsp salt
1/8 tsp pepper
1/2 tsp lemon juice
 Blend until smooth, then place into a sauce pan and add 1 bay leaf. Heat on medium low heat...
 You will want this sauce to simmer for a minimum of 20 minutes (but you'll get a good 30 minutes while you prepare the dough...)
So...while this simmers...let's make some dough!
place 3/4 cup warm water (not too hot, we don't want to kill the yeast), 1 TBS yeast, and 1 TBS sugar in a large-ish mixing bowl. Let it sit until the yeast starts to bubble (like in the picture below.) Take this time to preheat your oven to 350.
 (It will take anywhere from 3-5 minutes for the yeast to bubble, the bubbling means that its activated, alive, and feeding on the sugar.) Once its bubbling, use your handy 3/4 cup to put 1 scoop of flour into the water. Mix well and then add another 3/4 cup (that's right you will need 1 1/2 c flour in total) Slowly adding the flour like this and mixing well in between scoops will make it so you barely have to knead the dough at all to make it smooth. Once the flour is as mixed as you can get it with your plastic spatula/wooden spoon/whatever...comes the fun part (because the messy part of cooking is always the funnest part...) Get your hands in there and make sure that the flour is completely worked into the dough and the dough is smooth.
 Once the dough is smooth, let it sit for a few minutes, the less you handle it, the more chance the yeast has to work its magic quickly to make the dough fluffy (like 5 or 10), it will be slightly sticky and that is totally okay... It should look something like this:
 Now that its rested, roll out your dough. Create a round and go to town...I usually just spray my pizza pan and roll the dough out directly on it. You will want the rolled dough to have edges that go a 1/4 inch off of the pizza pan.
 (Adding sarcasm) Now here comes the REALLY hard part...
You are going to take some string cheese sticks out of their individual packets and cut them in half lengthwise (my 14 inch pizza pan needed 4 1/2 of them) and place them on the outside of of the pan on top of the dough.
 Then comes the tricky part of the hard part...you're going to roll the excess dough edge over the top of the string cheese and pat the edge down into the inside of the dough circle to close off the cheesy goodness so it can't escape during the cooking process.
 After the cheese is safely secured, take a handy dandy fork and poke holes in the middle of the circle to keep the dough from bubbling up as it cooks.
 Then, sprinkle garlic powder and parmesan cheese over the crust as evenly as possible, all the way out to the edges.
 Place the crust in the preheated oven and let it bake for 15 minutes. It will not be completely golden brown, but it will be cooked enough that it can hold up against whatever toppings you throw at it.
 Meanwhile, your sauce should be reduced enough to use on the crust. It should be thick enough that when you run your spoon through the pan, it leaves an open spot for a little while before the liquid redistributes itself, like so... Remove the Bay leaf and pour it over your now baked crust.
 Put a thin layer of toppings over the sauce....
 Then the cheese...and another thin layer of toppings (too thick and you won't be able to pick it up to eat it.)
 Crank your oven up to 400-425( if your oven runs hot, you probably only want to use 400) let it cook for another 12-15 minutes until the crust is golden brown and the cheese is bubbled up and slightly browned. and VOILA! Pizza deliciousness!

*Note- you can use tomato sauce instead of canned diced tomatoes...for a more robust sauce, you can use italian stewed tomatoes instead of regular diced.
**Another note- I used a colby jack cheese, but my husband prefers this dish with mozzarella, we just didn't happen to have any in the fridge. For a more "restaurant style" pizza, you probably want to use mozzarella, but if your kids and family are anything like mine, pizza is pizza, no matter what cheese you use. Jeff still ate it and thought it was delicious regardless of the cheese choice.
*** Another Another note- use whatever toppings your little heart desires. We just always happen to have pepperoni on hand (my 18 month old LOVES it as a snack) and that happened to be ALL we had on hand tonight. I would have loved to add some bell peppers, olives and mushrooms to make an almost supreme pizza...
****Another Another Another note- if you don't have string cheese, you don't HAVE to do stuffed crust with this recipe, just take the dough edge to the end of your pan or take it out the 1/4 inch and roll it over to give a more "bready" end to knaw on if you happen to be a family that LOVES their crust...
Bon Appetit until next time!!!
I know its super easy to call Dominos or Pizza Hut, make an order and wait for the delivery guy...
But, given our current employment situation (or lack thereof) a pizza delivery is just a luxury that we can't afford...
So, I ask you, WHY pay $20 for something that you can make for around $5-7 at home (depending on the amount of ingredients you use)? Plus...if you make it at home, you get the added peace of mind that comes from knowing exactly what ingredients are in the foods you're eating....
So, without further ado, I give you the one recipe that will make you want to forget about calling for a pizza delivery (at least my husband thinks so...and he is practically a food critic...)
So...here comes your picture tutorial!
You WANT to start your sauce first- the longer it gets to simmer, the more flavorful it will be.
Into your blender you want to place:
1 15 oz can diced tomatoes (juice and all)
1 tsp of sugar
1/4 tsp oregano
1/4 tsp basil
1/4 tsp thyme
1/2 tsp garlic powder (or 1 clove garlic minced...)
1/4 tsp salt
1/8 tsp pepper
1/2 tsp lemon juice


So...while this simmers...let's make some dough!
place 3/4 cup warm water (not too hot, we don't want to kill the yeast), 1 TBS yeast, and 1 TBS sugar in a large-ish mixing bowl. Let it sit until the yeast starts to bubble (like in the picture below.) Take this time to preheat your oven to 350.


You are going to take some string cheese sticks out of their individual packets and cut them in half lengthwise (my 14 inch pizza pan needed 4 1/2 of them) and place them on the outside of of the pan on top of the dough.


**Another note- I used a colby jack cheese, but my husband prefers this dish with mozzarella, we just didn't happen to have any in the fridge. For a more "restaurant style" pizza, you probably want to use mozzarella, but if your kids and family are anything like mine, pizza is pizza, no matter what cheese you use. Jeff still ate it and thought it was delicious regardless of the cheese choice.
*** Another Another note- use whatever toppings your little heart desires. We just always happen to have pepperoni on hand (my 18 month old LOVES it as a snack) and that happened to be ALL we had on hand tonight. I would have loved to add some bell peppers, olives and mushrooms to make an almost supreme pizza...
****Another Another Another note- if you don't have string cheese, you don't HAVE to do stuffed crust with this recipe, just take the dough edge to the end of your pan or take it out the 1/4 inch and roll it over to give a more "bready" end to knaw on if you happen to be a family that LOVES their crust...
Bon Appetit until next time!!!
Thursday, September 6, 2012
Parmesan Crusted Chicken Marinara
This is kind of a take on Chicken Parm...but its so easy and so restaurant quality delicious, its almost criminal NOT to post the recipe and share.
As my camera is packed away awaiting my induction on Saturday, I couldn't get a picture of it, which is a real shame, because it really does look like something you'd get at a restaurant and just looking at it definitely made me and hubby drool!
Here's what you need (this makes 4 fairly decent sized portions- if you have big eaters in the house, you may want to double it...)
2 large boneless skinless chicken breasts butterflied in half
1/4 c mayonnaise (NOT miracle whip, it will be too sweet.)
1/4 c parmesan cheese
1/4 c plain bread crumbs
1/2 TBS onion powder
1 TBS garlic powder
1/2 TBS garlic salt, plus more for sprinkling later
1 TBS dried parsley flakes
1 jar your favorite spaghetti sauce (I used my homemade freezer sauce that we love, it was a quart of sauce)
linguini/spaghetti noodles (whatever floats your boat.)
Heat your oven to 425 degrees. Place the butterflied chicken breasts on a greased cookie sheet or other type flat baking pan (I used my pizza pan because it was handy and a squirt of Pam) In a small bowl mix the mayo and parmesan cheese. Spread this mixture over the top of the chicken breasts, coating them generously. Once that bowl is empty, you can go ahead and use it to mix the bread crumbs and the spices, then sprinkle them generously over the chicken. Sprinkle with one finishing touch of garlic salt. Bake for 15-20 minutes. The crust will get golden and then chicken should be cooked through. (See what I mean EASY...you could also just use Seasoned Italian Breadcrumbs instead of making the breadcrumb mixture if you want to make it even easier. I didn't have Italian Breadcrumbs on hand, so I improvised...but I'm so glad I did...)
Boil your pasta and heat your sauce while the chicken is baking.
To plate, put a bed of pasta down, layer with sauce and then place the chicken on top....
DEVOUR and contemplate seconds... or thirds, or fourths(because its that good...)
SO easy, SO delicious...you'll never want to go to the trouble to make traditional Chicken Parm ever again.
Bon Appetit Darlings!
As my camera is packed away awaiting my induction on Saturday, I couldn't get a picture of it, which is a real shame, because it really does look like something you'd get at a restaurant and just looking at it definitely made me and hubby drool!
Here's what you need (this makes 4 fairly decent sized portions- if you have big eaters in the house, you may want to double it...)
2 large boneless skinless chicken breasts butterflied in half
1/4 c mayonnaise (NOT miracle whip, it will be too sweet.)
1/4 c parmesan cheese
1/4 c plain bread crumbs
1/2 TBS onion powder
1 TBS garlic powder
1/2 TBS garlic salt, plus more for sprinkling later
1 TBS dried parsley flakes
1 jar your favorite spaghetti sauce (I used my homemade freezer sauce that we love, it was a quart of sauce)
linguini/spaghetti noodles (whatever floats your boat.)
Heat your oven to 425 degrees. Place the butterflied chicken breasts on a greased cookie sheet or other type flat baking pan (I used my pizza pan because it was handy and a squirt of Pam) In a small bowl mix the mayo and parmesan cheese. Spread this mixture over the top of the chicken breasts, coating them generously. Once that bowl is empty, you can go ahead and use it to mix the bread crumbs and the spices, then sprinkle them generously over the chicken. Sprinkle with one finishing touch of garlic salt. Bake for 15-20 minutes. The crust will get golden and then chicken should be cooked through. (See what I mean EASY...you could also just use Seasoned Italian Breadcrumbs instead of making the breadcrumb mixture if you want to make it even easier. I didn't have Italian Breadcrumbs on hand, so I improvised...but I'm so glad I did...)
Boil your pasta and heat your sauce while the chicken is baking.
To plate, put a bed of pasta down, layer with sauce and then place the chicken on top....
DEVOUR and contemplate seconds... or thirds, or fourths(because its that good...)
SO easy, SO delicious...you'll never want to go to the trouble to make traditional Chicken Parm ever again.
Bon Appetit Darlings!
Tuesday, August 21, 2012
Spicy Chicken Penne With Spinach
If I had known that this recipe was going to turn out as delicious as it did, I probably would have taken pictures as I went....
Ever since I tried Pioneer Woman's creamy tomato pasta a few blogs ago, I have been looking for a chance and a way to use the recipe again in a new way. I found a recipe on Pinterest the other day that used a similar sauce for a spicy chicken dish...Well, me being me, I can't just leave it at the recipe that I'm given...I just have to adapt it.
Of course, I put my own spin on Pioneer Woman's sauce this time too... it was marvelous darling! Simply marvelous!
...really, the picture doesn't do it justice...
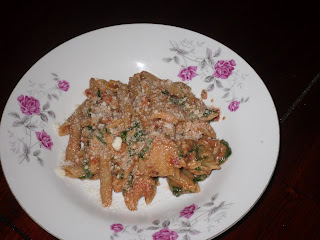
Here's what you need to do:
Boil water in preparation for cooking the noodles- I used 1/2 of a 13.25 oz box of whole wheat Penne. Cook according to package instructions.
1 large boneless skinless chicken breast cutlet, partially frozen (this makes it easier to slice)
1/2- 1 TBS red pepper flakes
1 TBS garlic powder (you could use 2 cloves garlic, minced if you want to make it fresh, but I was hungry and wanted dinner without garlic hands...)
1/2 -1 tsp garlic salt (to taste)
1/8-1/4 tsp pepper (to taste)
1 cup fresh spinach, stems removed and chopped (can use frozen spinach if you don't have fresh on hand.)
Slice chicken into thin, bite sized pieces (you want them to be about as thick as a silver dollar.)
Add about a silver dollar sized portion of oil to the bottom of a skillet and let it heat. Pour in your red pepper flakes and let them cook a bit to release some spice into the oil. They will start to turn slightly brown- this step literally only takes 30-45 seconds (you don't want them to burn). Add the chicken and sprinkle with the garlic powder, salt, and pepper. Sautee chicken until cooked through. Add the spinach and toss together. Let the chicken mixture cook until the spinach is slightly wilted. Remove from heat and set aside.
In a separate sauce pan, mix:
1/2 c parmesan cheese
1/2 c milk
1 TBS garlic powder
Let this mixture come to a boil, stirring frequently. It should thicken on its own as it cooks.
Add to this:
1 c of your favorite pasta sauce and cook together until heated through. (I make my own freezer pasta sauce. The last time I made a batch, I made it even more delicious by letting it cook in the crock pot all day long...we've vowed that A) We will never purchase store made pasta sauce again and B) I will forever more make it in the crock pot.... I just added a quart bag of my sauce to the mix instead of measuring out a cup.)
Remember those noodles? They should be cooked by now if you've been multitasking. Drain the noodles. Toss in the chicken mixture first, making sure that it mixes throughout the pasta then add the sauce mix and toss together.
Serve with extra parmesan cheese on top if desired. Pair it with a salad or some veggies and an awesome dessert and you have the makings of a date night if you really want it. Seriously, to us it tasted like something we'd order in a restaurant!
All together, this was a super easy dish to make. I literally had it done in 30 minutes (seriously, I started at 4 PM and it was done by 4:30...I had initially thought it would take longer to come together but I proved myself wrong.)
This is on my list of "make again" things and Jeff is super excited to take the leftovers for lunch tomorrow. (I will have to remember to save some for myself...) It easily made 4 large servings or 6 not so large servings if you're having salad and breadsticks (or just salad if you're watching the carbs like me.), so this will easily feed a large family with small kids.
Bon Appetit darlings...I'm always happy to share my culinary ventures...
Ever since I tried Pioneer Woman's creamy tomato pasta a few blogs ago, I have been looking for a chance and a way to use the recipe again in a new way. I found a recipe on Pinterest the other day that used a similar sauce for a spicy chicken dish...Well, me being me, I can't just leave it at the recipe that I'm given...I just have to adapt it.
Of course, I put my own spin on Pioneer Woman's sauce this time too... it was marvelous darling! Simply marvelous!
...really, the picture doesn't do it justice...

Here's what you need to do:
Boil water in preparation for cooking the noodles- I used 1/2 of a 13.25 oz box of whole wheat Penne. Cook according to package instructions.
1 large boneless skinless chicken breast cutlet, partially frozen (this makes it easier to slice)
1/2- 1 TBS red pepper flakes
1 TBS garlic powder (you could use 2 cloves garlic, minced if you want to make it fresh, but I was hungry and wanted dinner without garlic hands...)
1/2 -1 tsp garlic salt (to taste)
1/8-1/4 tsp pepper (to taste)
1 cup fresh spinach, stems removed and chopped (can use frozen spinach if you don't have fresh on hand.)
Slice chicken into thin, bite sized pieces (you want them to be about as thick as a silver dollar.)
Add about a silver dollar sized portion of oil to the bottom of a skillet and let it heat. Pour in your red pepper flakes and let them cook a bit to release some spice into the oil. They will start to turn slightly brown- this step literally only takes 30-45 seconds (you don't want them to burn). Add the chicken and sprinkle with the garlic powder, salt, and pepper. Sautee chicken until cooked through. Add the spinach and toss together. Let the chicken mixture cook until the spinach is slightly wilted. Remove from heat and set aside.
In a separate sauce pan, mix:
1/2 c parmesan cheese
1/2 c milk
1 TBS garlic powder
Let this mixture come to a boil, stirring frequently. It should thicken on its own as it cooks.
Add to this:
1 c of your favorite pasta sauce and cook together until heated through. (I make my own freezer pasta sauce. The last time I made a batch, I made it even more delicious by letting it cook in the crock pot all day long...we've vowed that A) We will never purchase store made pasta sauce again and B) I will forever more make it in the crock pot.... I just added a quart bag of my sauce to the mix instead of measuring out a cup.)
Remember those noodles? They should be cooked by now if you've been multitasking. Drain the noodles. Toss in the chicken mixture first, making sure that it mixes throughout the pasta then add the sauce mix and toss together.
Serve with extra parmesan cheese on top if desired. Pair it with a salad or some veggies and an awesome dessert and you have the makings of a date night if you really want it. Seriously, to us it tasted like something we'd order in a restaurant!
All together, this was a super easy dish to make. I literally had it done in 30 minutes (seriously, I started at 4 PM and it was done by 4:30...I had initially thought it would take longer to come together but I proved myself wrong.)
This is on my list of "make again" things and Jeff is super excited to take the leftovers for lunch tomorrow. (I will have to remember to save some for myself...) It easily made 4 large servings or 6 not so large servings if you're having salad and breadsticks (or just salad if you're watching the carbs like me.), so this will easily feed a large family with small kids.
Bon Appetit darlings...I'm always happy to share my culinary ventures...
Tuesday, July 24, 2012
Adventures in Low Carb Cooking: Cauliflower Pizza Crust Pizza
Last night, we braved the Cauliflower Pizza Crust that I've been seeing so much on Pinterest.
I wish I had pictures to show you, but alas I could not find the camera. It is hiding after our trip to Idaho apparently... However, my pizza didn't turn out as "pretty" as the pictured pizza in the recipe I used, so maybe you don't want to see it...
My husband has given me permission to try again some other time so I can work out the kinks. In his opinion, it wasn't bad, but it wasn't amazing enough that he'd want to give up regular pizza crust...I thought it was good, but could have been better. I think I just need a little more practice at it, and need to work out a few kinks that I found in the recipe as I was making it.


(photo courtesy "Stick a Fork in It")
Again, I wish mine had turned out this pretty....
As we didn't have any dried garlic powder and I was feeling lazy and didn't want to mince or crush any fresh garlic last night, I used onion powder in lieu of crushed garlic. I actually would highly recommend this change. It added another dimension of flavor and I think that with just garlic it would have been overpowering or fallen flat...
As far as the rest of the recipe is concerned...
I used the suggestion to use half the suggested amount of cheese. I somewhat wonder if the crust would have set up better if I'd used a whole cup instead of half a cup...because mine definitely DID NOT look as good as her picture. However, I didn't feel like using half the cheese was a detriment to the flavor in the long run, so if you're concerned about fat content, I say go for it and use half.
I also think the crust was WAAAAAY too salty. I would highly recommend only using half the salt in the recommended recipe.
When it comes to ricing the cauliflower (grinding it up) I would say just go for the cheese grater. I tried using my food processor and it kept just getting stuck. I finally moved to just quartering large pieces and using the cheese grater to rice the cauliflower and it was MUCH, much faster.
Definitely cook the riced cauliflower for the 8 minute time mark. I think it would have helped to mash up the cauliflower a little more and would have made it set up better. I only cooked it for 6 minutes. I also would suggest using half the water to steam it in the microwave. When I poured my crust out to shape it, it was very watery. Maybe I just had a pretty "juicy" cauliflower, but in my experience, you can always add more water, its harder to take it away, especially if you don't notice that its watery until you're pouring it out...
I think I also formed my crusts too thin. The recipe said it is supposed to make a 9 inch crust, I think next time I will err on the side of an 8 inch crust. I think it just needed a little more thickness to get crusty and crispy as it baked up.
When it comes to preparation and clean up: I used my spiffy Pampered Chef measuring cup/tupperware thing to mix the crust...it has a spout and has the cup measurements along the side. It made clean up a breeze. I say, if you have a way to mix and measure everything all at once, go for it! As far as ease and clean-up of this recipe are concerned, I think that was one of the best parts. It made much less mess than a homemade pizza dough does.
As far as serving size is concerned: ITS HUGE! This recipe is a single serving 9 inch pizza, and when I worked out the amount of carbs per this serving it seemed too good to be true, but it is. Here are my measurements. We had pepperoni and mushroom pizzas.
Cauliflower- 2.2 grams carbs
Cheese- 0.7 grams carbs
Egg- 0.24 grams carbs
Mushrooms- 0.5 grams carbs
Pizza sauce- 1/4 cup at 4 grams per serving (I didn't use that much, but I don't want to sit down and figure out how much of a percentage of 1/4 cup 3 TBS is....and some people like really saucy pizza so...there you go...)
Pepperoni- 16 slices= 1 gram carbs
So, your own personal, giant 9 inch pizza is 8.64 grams of carbs!!!!
(Somewhat related but unrelated side note: I found a new favorite website to help me out: http://www.carb-counter.org/ it has carbohydrate measurements for practically EVERY food you could eat. I will be referring to it a lot more and as I post recipes I will be trying to give you a carb total for each one so that you can see how much you're getting in a serving. )
I only ate half of my pizza with a side of salad with balsamic dressing, so I didn't even get that many. It was so big I couldn't eat it. So, that myth of not being able to get full off of "diet food" is dispelled!
I'm pretty sure my husband only ate half of his as well, but i also have to wonder if that has more to do with him not being 100% thrilled with it, and him having snacked all through the afternoon. (He's such a trooper. We bough a multi-pack of potato chips for snackage for our trip to Idaho and he's been eating away at them so that I have no temptation in the house. Didn't I marry a sweetie?)
In short, we will definitely be trying it again. Judging by how it turned out last night, I'd give it 2 out of 5 stars... Maybe, when I try it again with the adjustments I've thought of, that rating will go up.
All in all, if you're dieting and you have to have pizza this is a good alternative. Its not as 100% satisfying as a greasy, bready slab of pizza is, but it did kill the pregnancy craving I'd been having for over a week...so it was pizza enough for me.
Bon appetit darlings! Let me know if you use some of my adjustments and how it turned out.
Subscribe to:
Posts (Atom)